Today Hator Gaming is happy to present the beta-version release of Hator Gaming software for managing peripherals. We kindly appreciate all customers who have already purchased Hator Gaming products for their trusting and patient attitude, as the delayed software launching has not been scheduled and, alas, we have been forced to make a lot of changes when the product has been already available for selling.
We would like to note that this is just the first release of software beta-version which includes the most essential functions for managing backlight, reassigning function keys, DPI modes and writing macros for Hator Gaming devices. Current version presents the software as a separate driver for each device.
For the future, we plan to perform ongoing enhancement of software localization and functions. If you have any comments on its operation or suggestions for its improvement, please let us know by filling out the appropriate form on the link.
The below-given instruction manual is targeted at new users and will help them understand the software basic functionality of Hator Gaming devices and assist in its customization.
Fast navigation:
-
Selecting the driver. Downloading and installing.
-
Interface and software navigation.
-
Changing the mouse button functions. Profiles of button setting.
-
Macro manager. Writing and assigning of macros.
-
Customization of sensor setting. DPI levels, sensor sensitivity, polling rate.
-
Set up the backlight
-
Saving and downloading of available configuration presets.
Selecting the driver. Downloading and installing.
Hator Gaming Software is available for downloading on the appropriate download page. Currently, the software is represented by separate drivers for each device. Please download and install only the drivers you need that match the products you purchased.
Important: For all mice the language you selected while installing will be interface language after the application is installed, we advise you to pay attention to this fact as for changing the language you will need to reinstall the software.
We recommend you to perform the installation as an administrator, specifying the default directory on drive C, and avoid Cyrillic characters in the path to driver files.
When installed, the device management application icon appears in the taskbar tray.
Interface and software navigation.
Let’s consider the driver main menu of Hator Vortex mouse using as an example. The menu bar at the top is responsible for downloading and saving of available configuration presets, as well as for complete resetting of all changes made. “Setting” button switches you to the menu of button functions changing and profile selecting, “Backlight” button is responsible for configuration menu of RGB backlight modes and profiles, “Macros” button switches you to a macro editor, and “DPI change” button is responsible for mouse sensor setting menu.

Changing the mouse button functions. Profiles of button setting.
Menu for changing the mouse button functions is available by pressing the “Setting” button in software main menu.
In the open menu, you can reassign any mouse button, excepting the LMB, to any other command or macro. To do this, by pressing the button please select in the list the function you want to change and choose the appropriate command from a drop-down list.

Having selected one of the configurations at the top of the program window, you can create a custom profile of settings for a certain game or application and switch to it using “Layout change” command or manually.
To save or cancel all the changes you have made, click Accept or Cancel button in the bottom right corner of the program.
Macro manager. Writing and assigning of macros.
Macro manager or editor is a menu where the user can write his own macro before assigning it to the mouse button. For recording you can use both keyboard shortcuts and mouse commands.
Let’s consider interface of the macro editor window.
Set one of the three delay modes before recording the macro. You can record the button exact hold time, set manually a time of delay between in or record macros without delay.
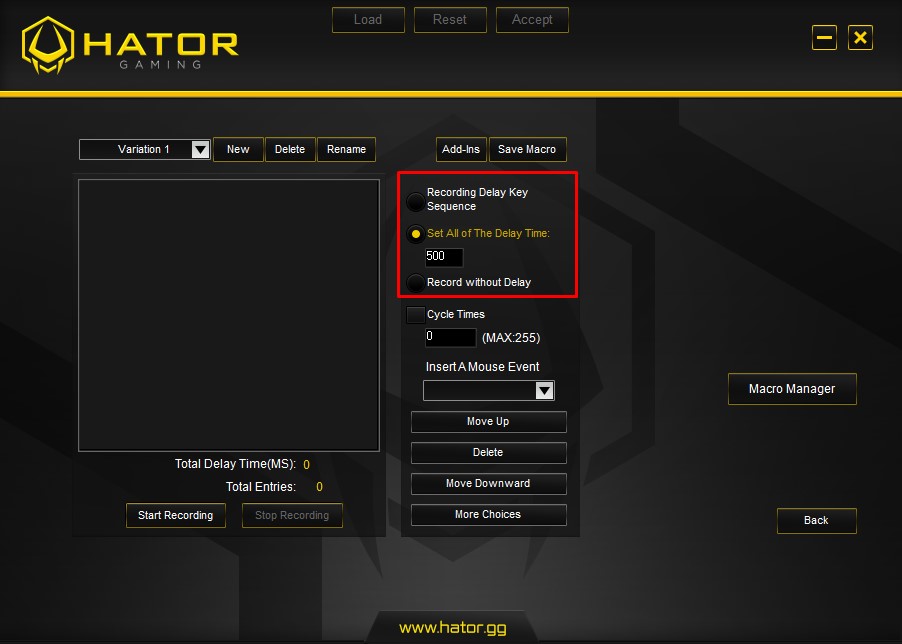
1) Record a delay.
In this mode the program will remember how long each key has been pressed before releasing.
2) Set a delay.
In this mode between each of user’s commands, there will be set a certain delay within the specified range (from 1 to 9999 MS)
3) Recording without delay
In this mode macro will be recorded without delay between user’s commands.
When delay mode is set, you can start recording the macro. Press the “Start recording” button and run the necessary sequence of commands using keyboard or mouse buttons. The maximum length limit of a macro for Hator Gaming mice is 60 commands.

You are able to edit a ready macro by changing the delay time manually. Editing window opens by double-clicking the LMB on delay value.
To paste, copy, delete or change the sequence of commands in the recorded macro, please use “More Choices” buttons of the drop-down list and “Move up”, “Delete” or “Move downward” buttons
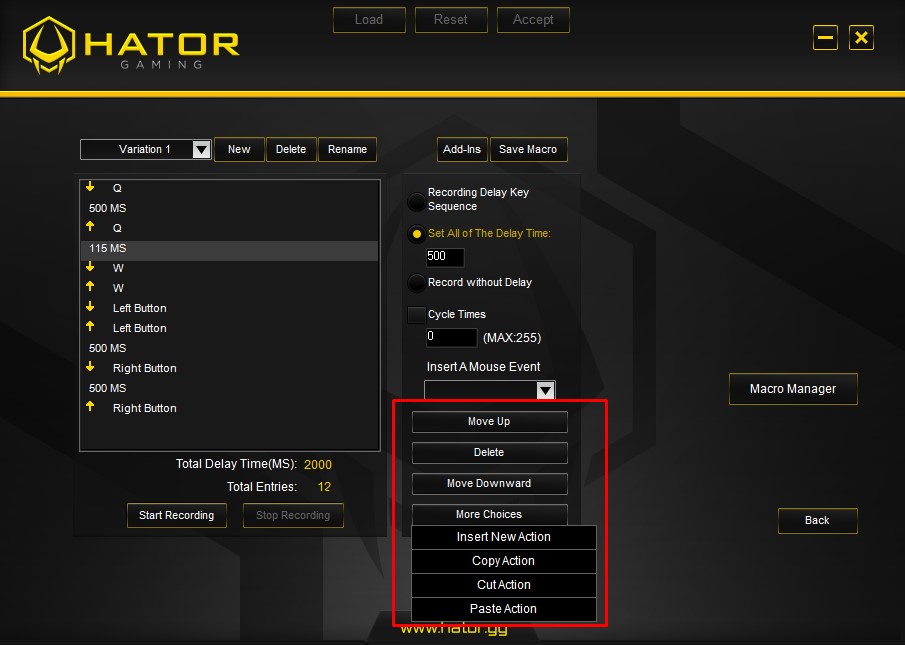
The number of default macro playback loops is to 1, but you can change this value up to 255 in “Total loops” column.
To assign a macro, please return to the setting menu of mouse buttons. Press LMB on the button where you are going to assign a macro and choose in the drop-down list the appropriate parameter “Macros”
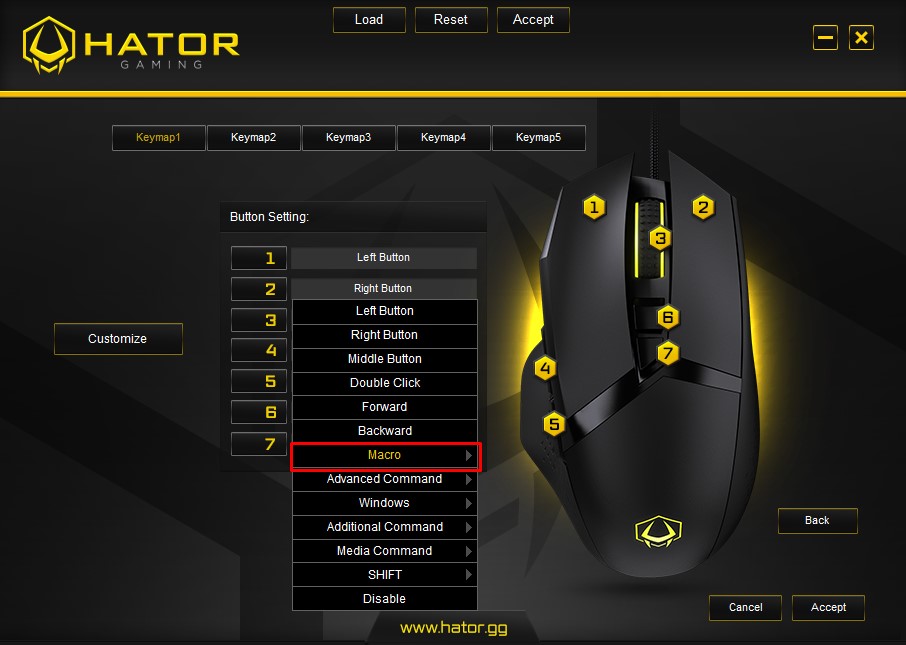
In open window please choose the respective macro that we have created earlier in macro-editor and specify the playback looping.
The program supports 3 types of playback loops.
- The macro will be run a number of times set in “Total loops” column that has been specified in the editor or before the button is pressed again. Should you not specify any values in this column, it will run 1 time by default.
- Repeat before the button is pressed. In this mode the macro will loop indefinitely until you press the macro command button again.
- Repeat before the button is released. In this mode the macro will be played back while the command button is held down.
Customization of sensor setting. DPI levels, sensor sensitivity, polling rate.
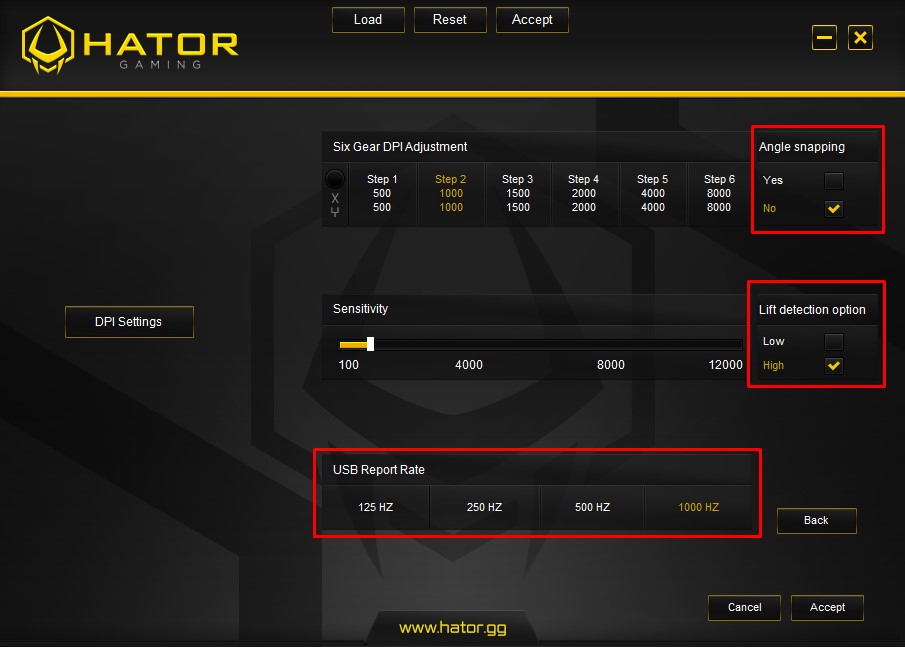
Configuration menu of mouse sensor setting enables changing parameters and DPI profiles, adjust polling rate of USB port, angle snapping and lift-off distance*.
To enter this menu, please press the “DPI Settings” button in program main menu.
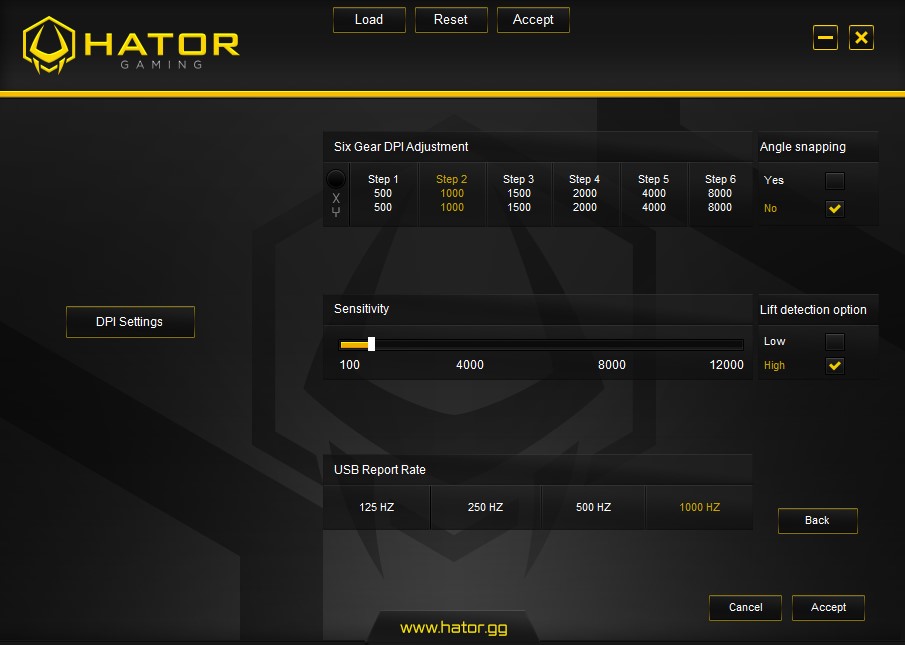
*Lift off distance may be adjusted only for Hator Deigh and Hator Vortex mice.By default, Hator Deigh and Hator Vortex mice have 6 configured profiles with 500 – 1000 – 1500 – 2000 – 4000 – 8000 DPI resolution. Hator Mirage has 4 profiles with 500 – 1000 – 1500 – 2000 DPI parameters. You can modify any of presets by choosing its LMB and changing the sensitivity value with the appropriative slider.
Minimum DPI value for Hator Deigh and Hator Vortex equipped with PixArt PWM 3360 sensor – is 100, the maximum is 12 000. You can edit DPI at scaling span of 100 units.
For Hator Mirage and Avago 3050 sensor the minimum value is 250, the maximum value is 2000, and DPI changing span is 250.
This menu also allows changing the setting of angle snapping, lift off distance and USB polling rate.
Setting the backlight.
Backlight customizing menu is available upon pressing the “Color Settings” button in application main menu.
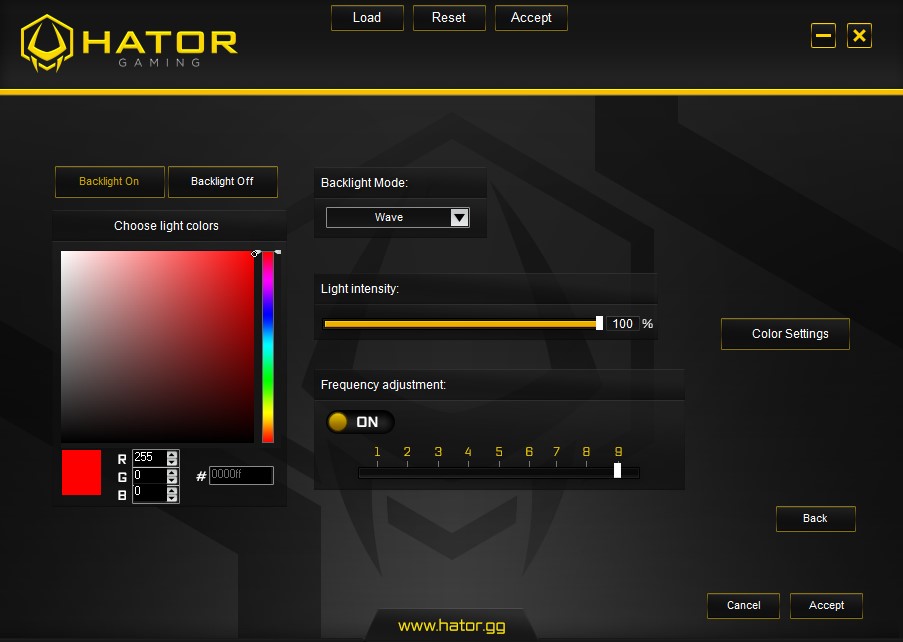
In this menu you can adjust color, flicker frequency, brightness and backlight modes of your device using available preset or manually. Use the “Backlight Off” button to turn off backlighting.
Mouse scroll wheel is responsible for the selected DPI mode and is always backlighted.
Saving and downloading of available configuration presets.
To apply available setting profiles, please use the two buttons – “Download” for importing and “Save” for exporting. “Reset” button will bring back all settings and changes in current profile of mouse setting to factory one.
