This manual contains quick guidance for connecting and customizing the Hator Earthquake, Hator Rockfall and Hator Rockfall TKL keyboards. The same Guide for Hator Gaming mice customization can be found at this link.
We remind you that Hator devices software is available for download on the appropriate download page at Hator.gg website. The drivers are in beta testing and we are aware of several shortcomings in their localization and performance. These drivers contain the most essential features for basic customization and configuration of your devices and will be repeatedly updated. We thank our users for their patience and support, and should you have any questions and wishes, please contact us through the feedback form.
Quick manual navigation:
- Selecting the required driver and installing.
- Interface software navigation.
- Assigning of button functions.
- Macro editor. Writing and assigning of macros.
- Backlight.
- Answers to frequently asked questions.
1. Selecting the required driver and installing.
Go to download page and select the required driver. Only one driver per one model of Hator Gaming keyboard can be installed on the user’s PC at a time. Install only the driver that matches the device you purchased.
We recommend you perform installation into a default folder on drive C. Do not use Cyrillic characters in the folder path. Sometimes it may be required to add a program folder to exceptions list of your anti-virus and/or Windows firewall.
2. Interface software navigation.
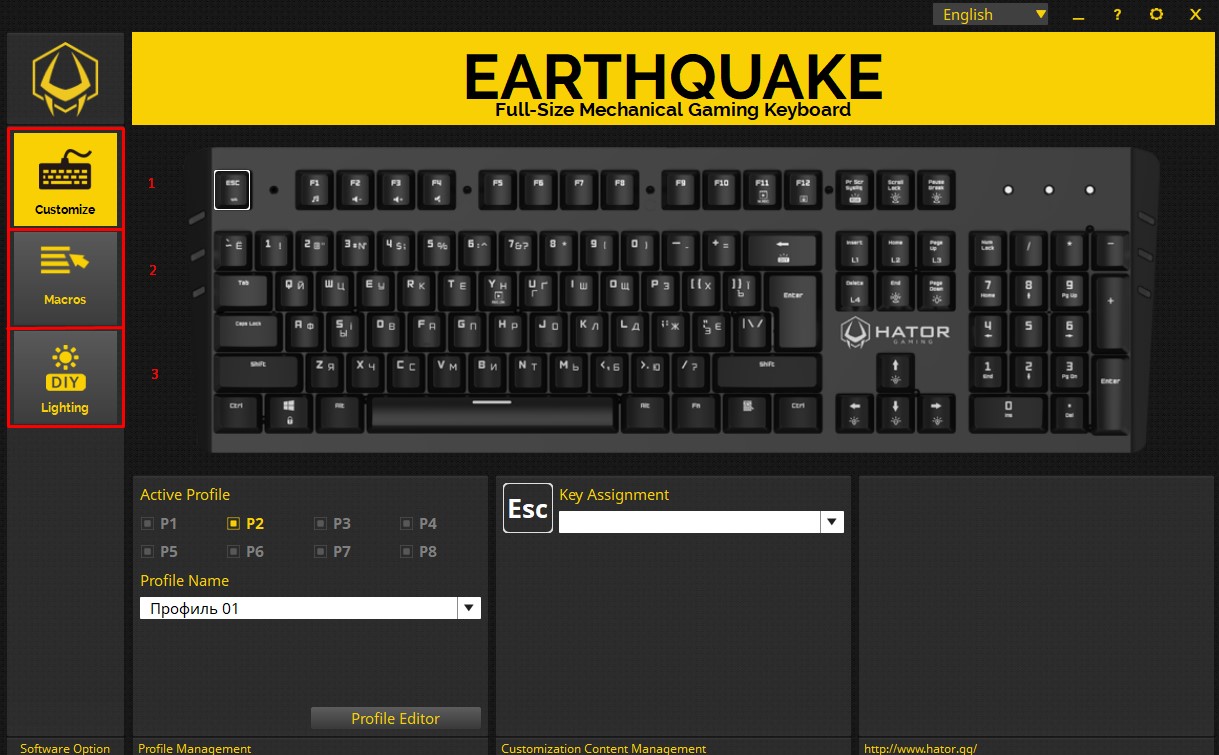
Unlike Hator Gaming mice, the keyboard driver interface has no main page and is represented by three setting tabs. The “Customize” tab is responsible for changing the functions of each key, the “Macros” tab enables you creating your own macro or importing a saved one, and the “Lighting” tab allows you adjusting all RGB led backlighting of the keyboard, its effects, and profiles.
3. Assigning of functions to a button.
3.1. Changing of functions.
Let´s consider the first setting tab.
Having selected a button by clicking a mouse, you can change its functions.
Listed below are available functions: Default profile, Disable key, Other keyboard commands, Mouse command, Assigning of macro, Media command, Windows Hotkey, Start a certain application or open a website.
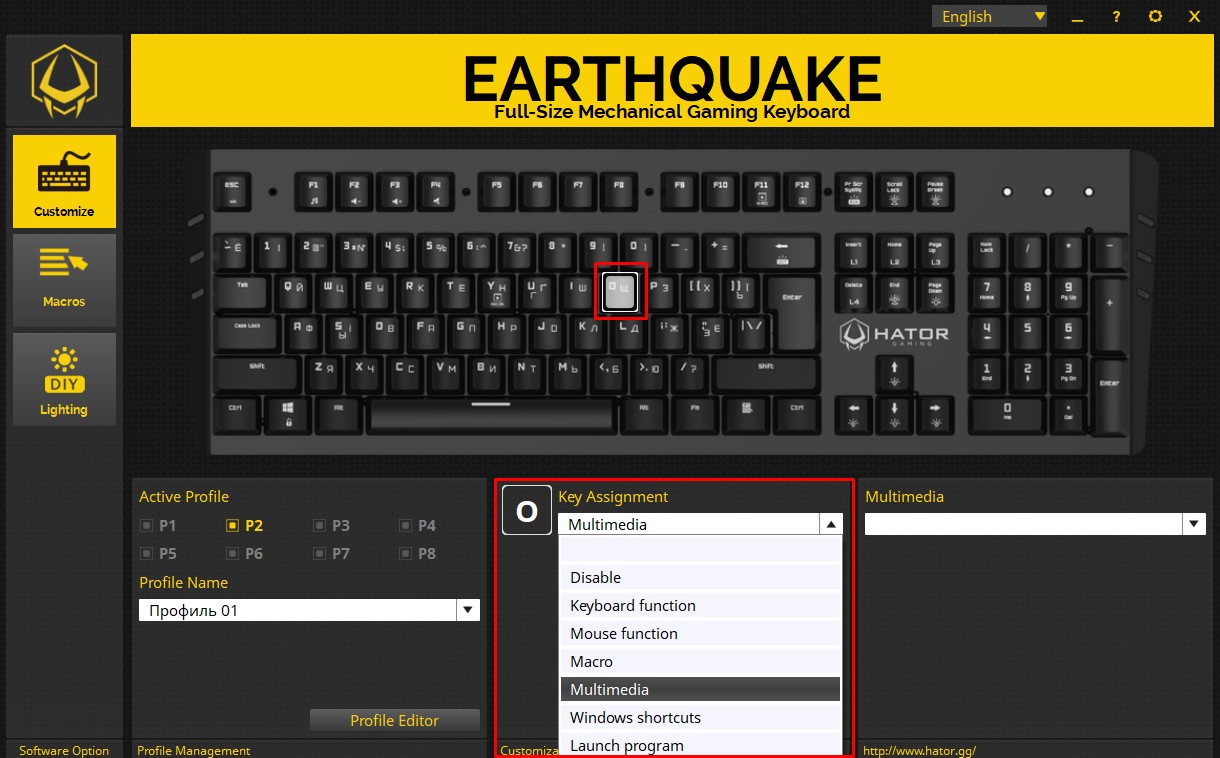
3.2. Setting Profiles. Profiles editor.
Each change is recorded in a certain setting profile, in all, keyboards support up to 8 simultaneously used profiles, but you can create a much larger number.
To create or edit a profile, please use the “Profile Editor” key. This editor allows you adding, importing, exporting, copying and renaming of profiles. You can also associate a certain program, and the profile will be automatically used when running the specified game or application.
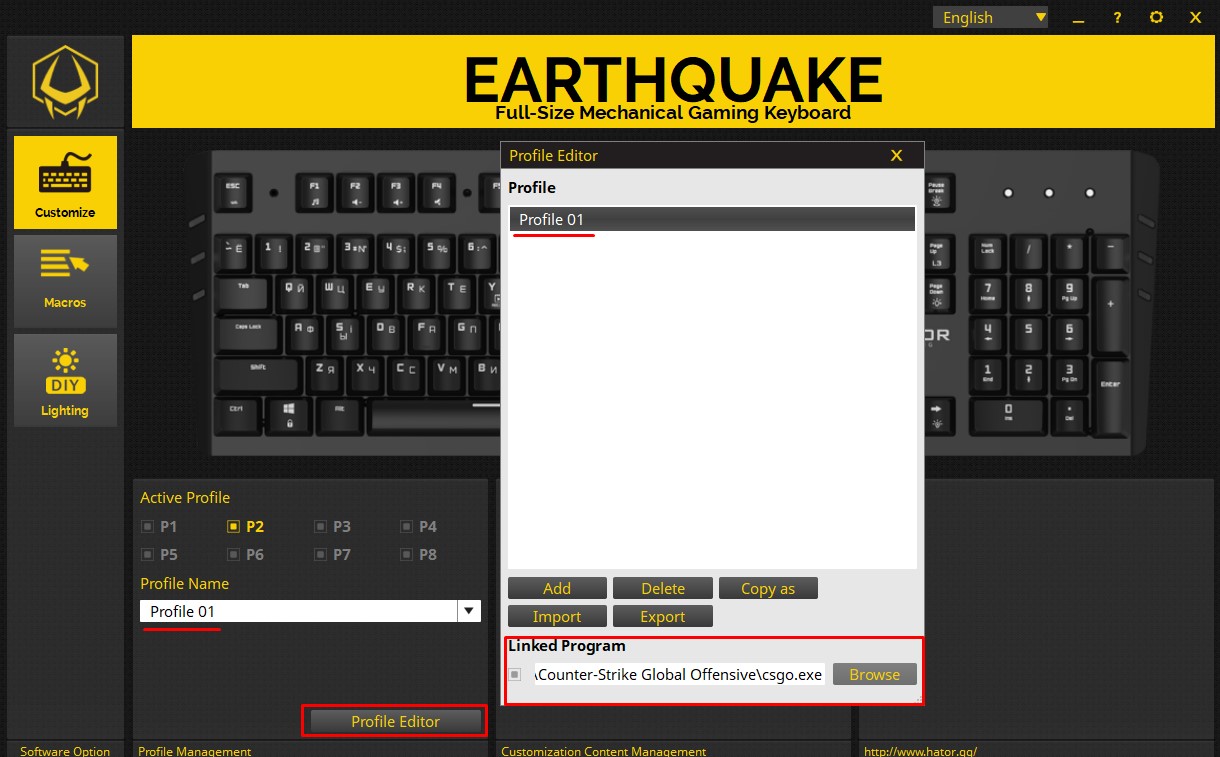
Upon saving a profile on “Customize” tab, specify which active P1-P8 profile the newly created one will correspond to.
4. Macro editor. Writing and assigning of macros.
To create your first macro, click on the “Add” button while on the “Macros” tab, and then set the required latency between commands.
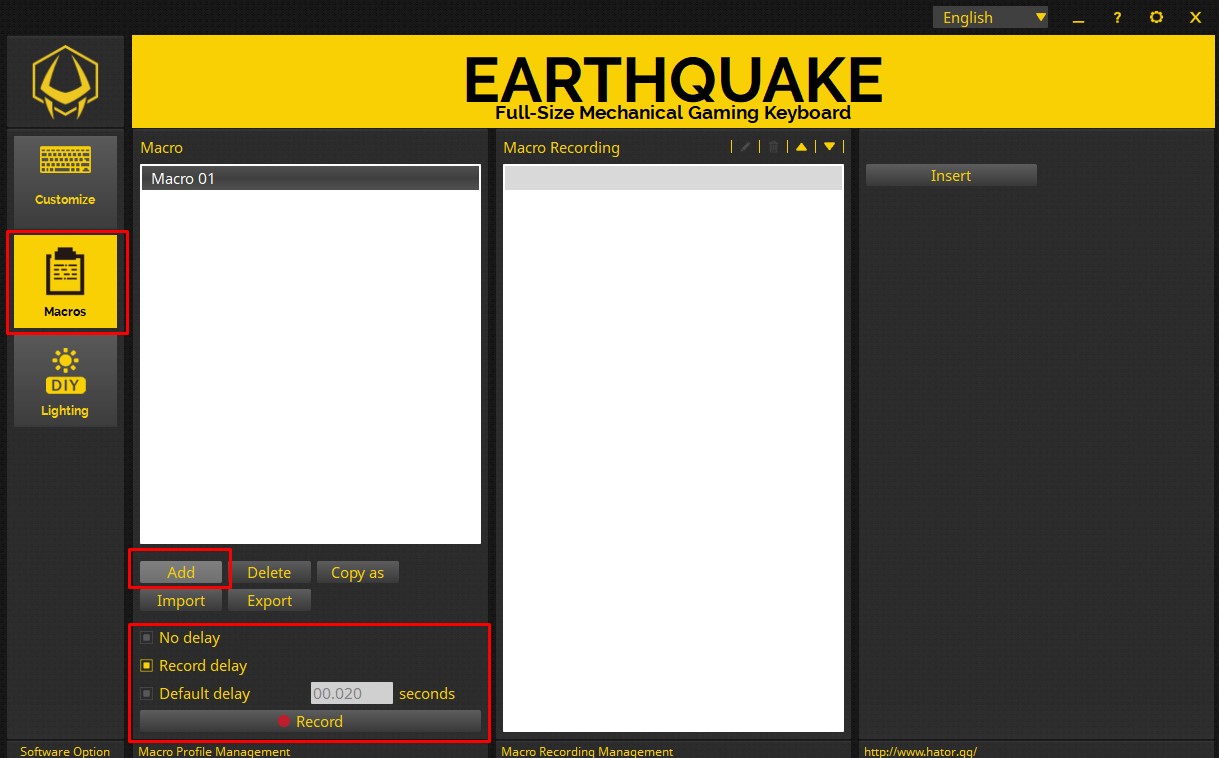
There are three control modes of latency:
1) No latency – in this mode the delay between each command will be 0ms.
2) Recording the latency – in this mode, the program will record all the intervals between pressing and holding the buttons and play them back.
3) Manual turning of latency – in this mode you can specify what latency you need between each command in macro.
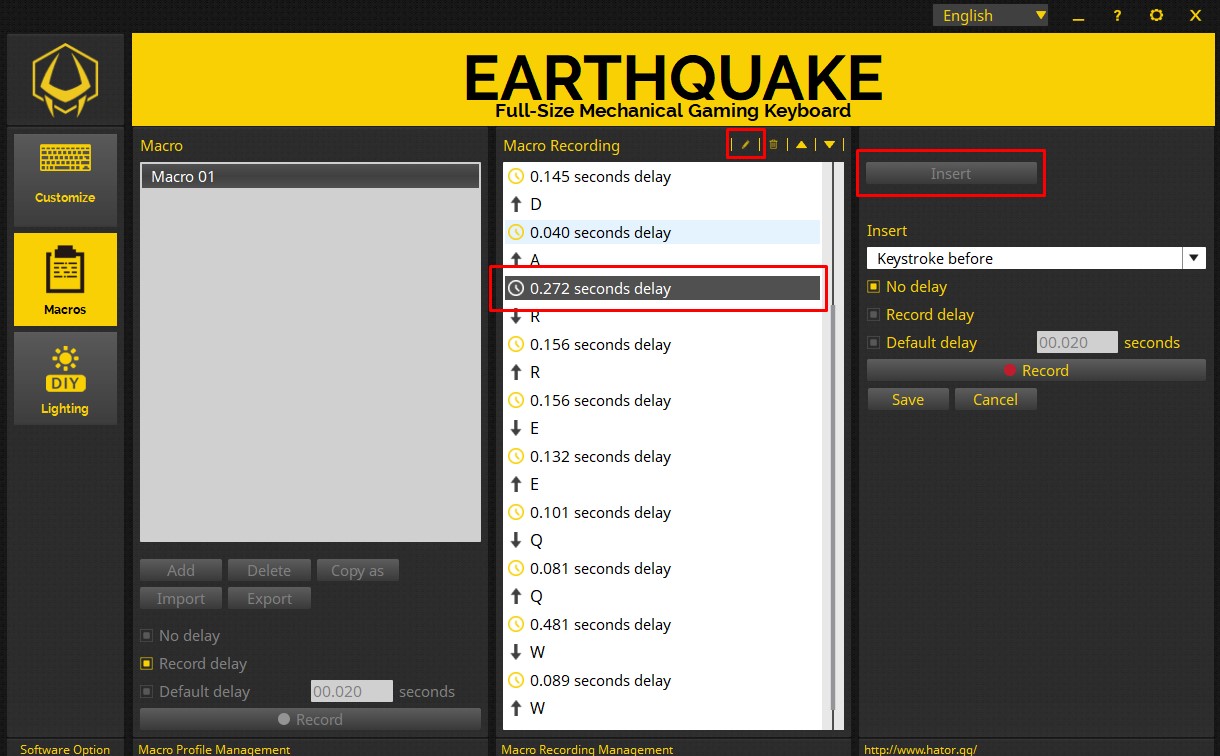
Any command in macro may be edited by clicking on “Edit” icon. Next, to this icon, there are a delete/move command buttons.
If you need to add a command inside the ready macro, please use the “Paste” button. Using this option, you can add an advanced latency or key shortcut before or after the selected command.
The ready macro can be assigned in the first tab “Customize“ by selecting the appropriate parameter in the ”Key Assignment” section. Then, specify the appropriate macro and playback mode (option).
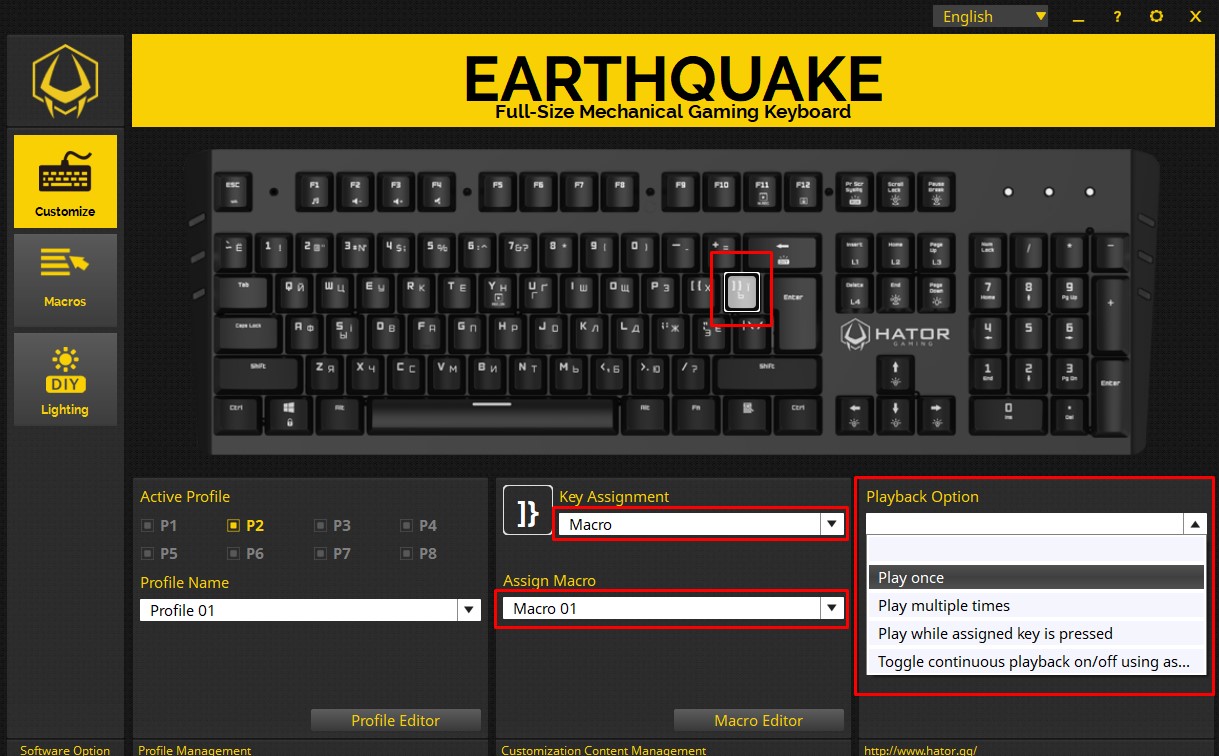
At the moment there are 4 playback options for macros:
1. Playback one time.
2. Playback the specified number of times.
3. Repeat macro playback while the command button is pressed.
4. Start or stop repeating macro playback by pressing the command button.
Macros support importing and exporting files with extension *.macro. This will allow you to relocate your setting parameters or to apply ready macros from other users.
5. Backlight.
The tab with the name “Lighting” is responsible for the keyboard backlight setting. On this tab, you can select one of 12 available presets by adjusting brightness, animation speed, color palette and animation moving direction (only for presets where this setting is accessible)
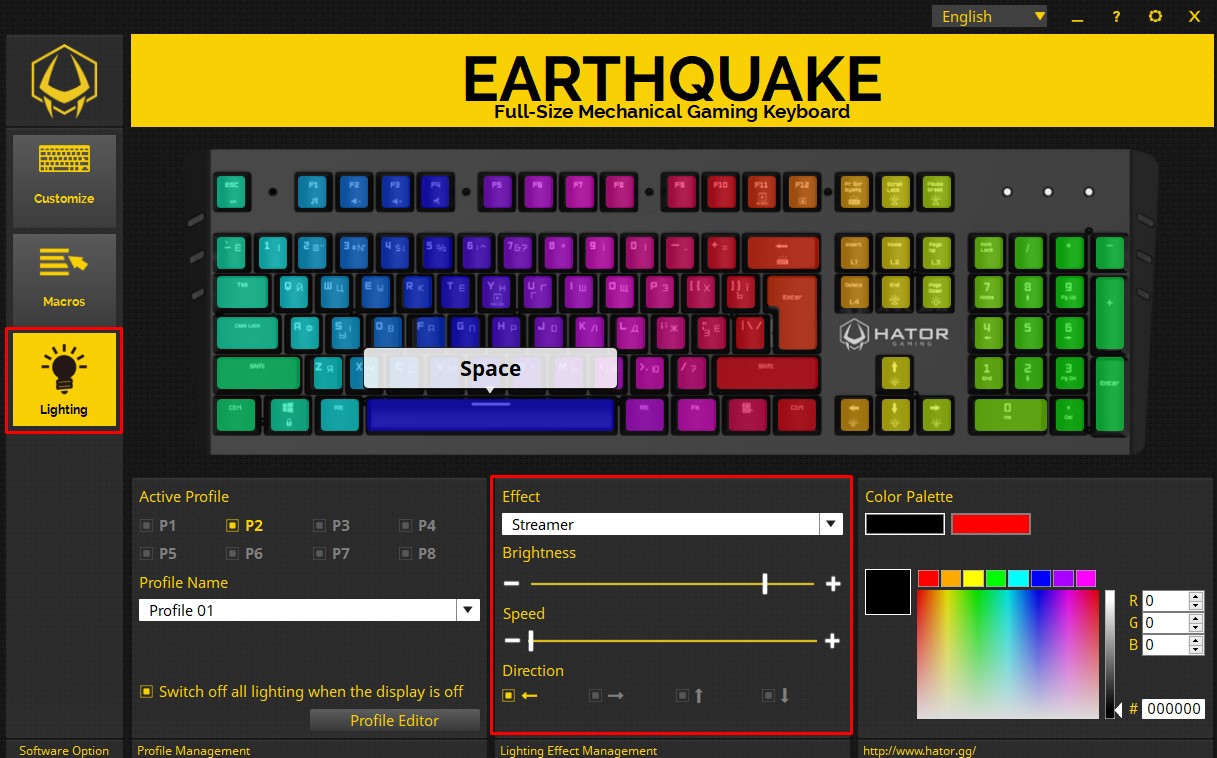
All setting parameters of backlight effects are also moving to the active profile whereto button values are attached as well.
You can create your own backlight template by selecting the “Custom” mode.
In this mode, you can choose one of the available presets for different games or create your own. Press the “Add” button and enter a name for your templates, then using the cursor select the keys which backlight you want to change and assign your color in “Color palette”
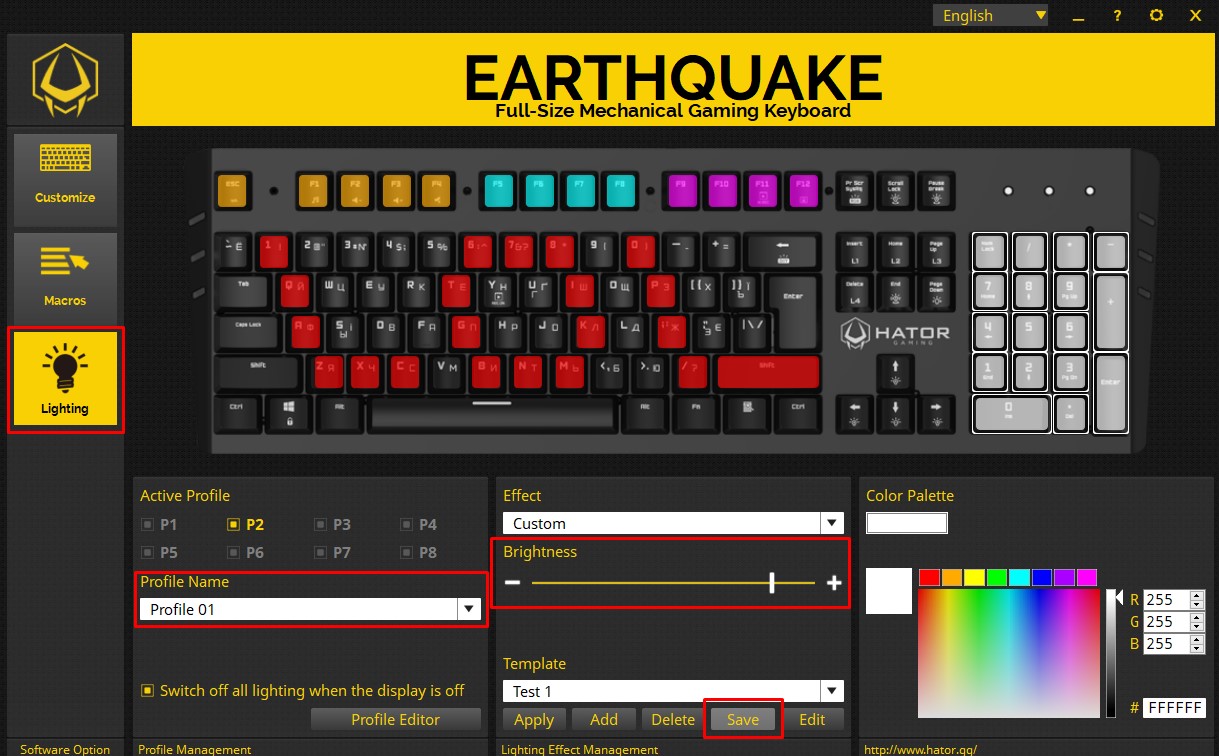
Adjust backlight brightness and save your template by pressing the “Save” button.
6. Answers to frequently asked questions.
Q: Where can I download the driver for my Hator Gaming device?
A: Driver is available for download for each product and also by linking to hator.gg/download page.
Q: What operating systems do Hator Gaming Software and devices support?
A: Hator Gaming devices are connected to and identified by Mac OS, Linux, Windows 7, 10. The driver beta version for devices customization is supported by Windows OS 7 and 10 versions.
Q: How do I change driver interface language?
A: At the moment, language changing inside the program is available only for keyboard driver. To change the interface language of mice software, you need to uninstall and reinstall the program by selecting the desired language at the first installation stage.
Q: I have several Hator Gaming devices; do I need to install a driver on each of them?
A: Yes, within beta testing, the software will be presented as a separate executable file for each device. When development is complete, all devices will be united into one Hator Gaming launcher.
Q: Is this the final program version? What should I do if it does not have the functions I need?
A: Currently the Software contains only the most necessary functions for device customization and management. We will consider all opportunities for adding new features in future updates if we deem them really indispensable. You can write to us any suggestions to improve the software using the feedback form.